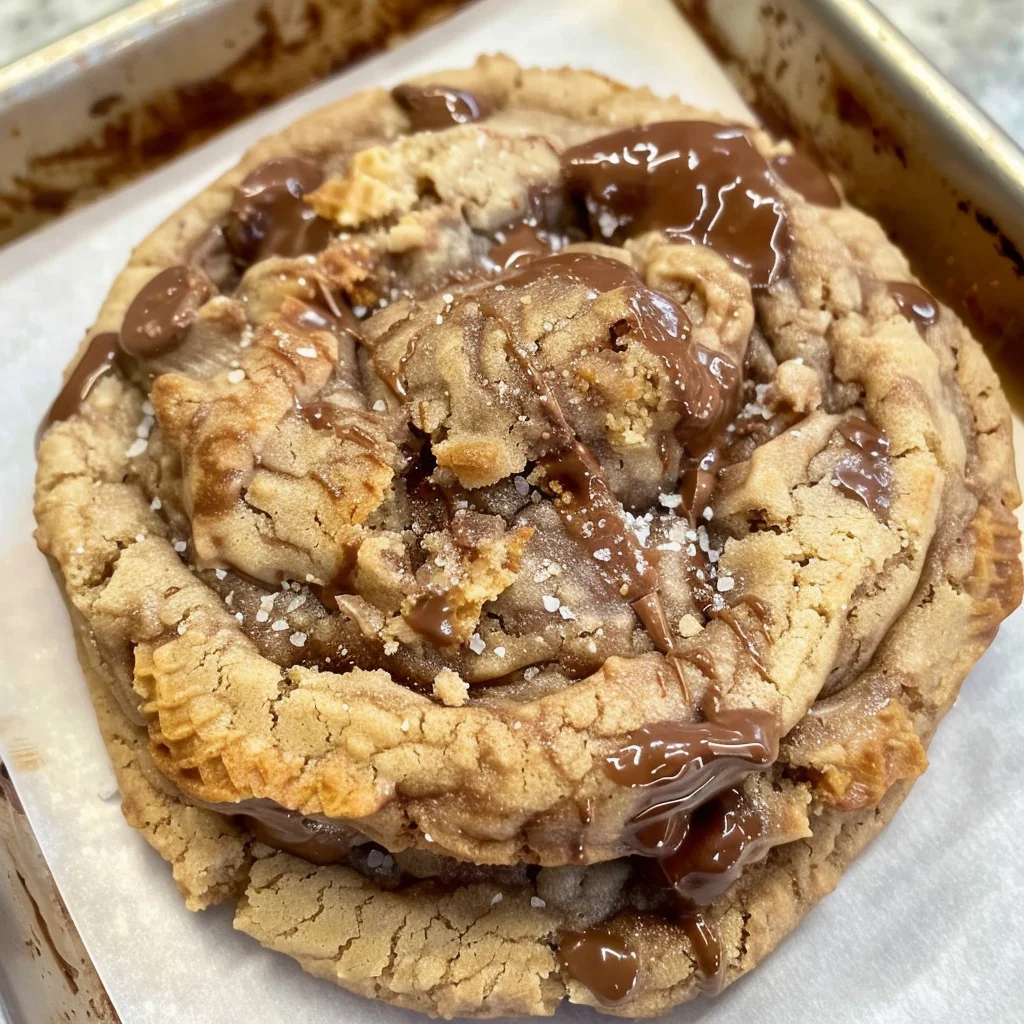
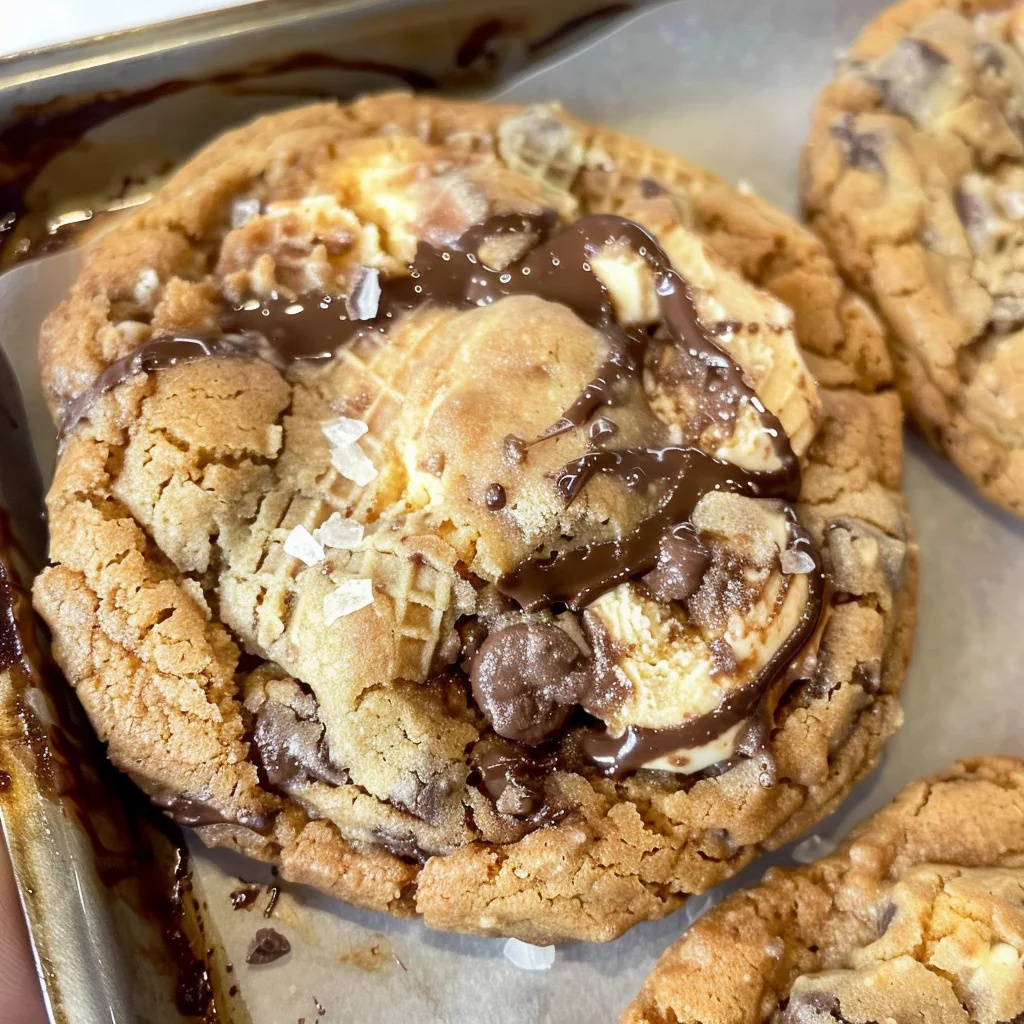
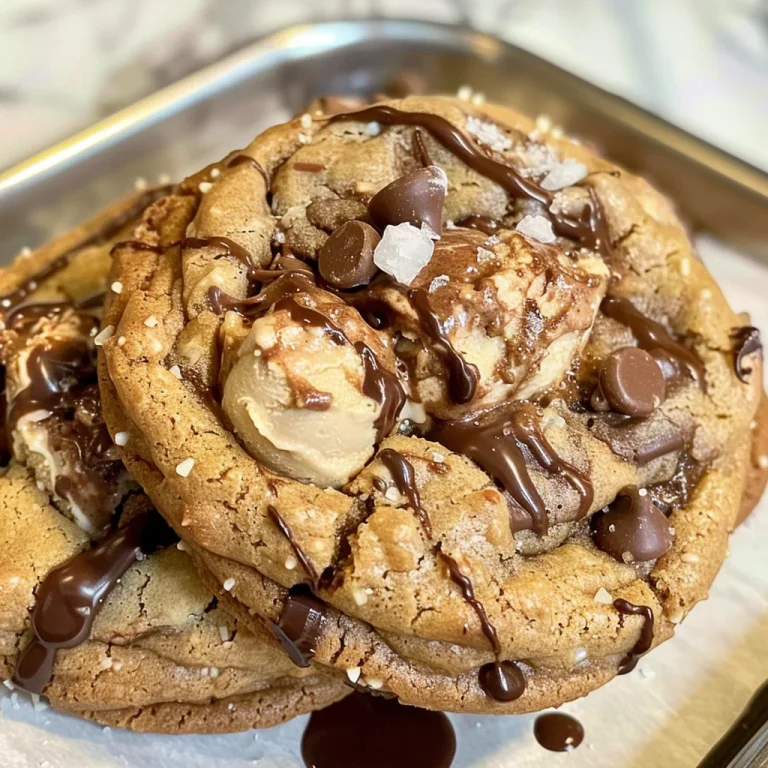
If you’re looking for a fun and delicious treat that brings a smile to everyone’s face, these Ice Cream Cone Cookies are just the ticket! With their chewy texture, chocolatey goodness, and delightful bits of broken ice cream cones, they’re perfect for busy weeknights or family gatherings. Imagine the joy of biting into a cookie that reminds you of your favorite summer treat—it’s a nostalgic experience that everyone will love!
These cookies are not only scrumptious but also incredibly easy to whip up. Whether you’re hosting a casual get-together or simply want to indulge in something sweet after a long day, these cookies will be a hit. Plus, they make great gifts or party favors when you want to share something special with friends and family.
Why You’ll Love This Recipe
- Quick and Easy: These cookies come together in just 27 minutes from start to finish!
- Family-Friendly: Everyone loves cookies, especially when they come with a unique twist.
- Make-Ahead Delight: Bake them ahead of time and store them for later snacking or sharing.
- Deliciously Decadent: The combination of chocolate chips and hot fudge creates irresistible flavor swirls.
- Fun Presentation: Each cookie is topped with flaked salt for that sweet-and-salty combination that’s hard to resist.
Ingredients You’ll Need
Making these Ice Cream Cone Cookies is simple with just a handful of wholesome ingredients. You probably have most of them in your pantry already! Let’s gather everything we need for these delightful treats.
For the Cookie Dough
- ½ cup butter
- ¾ cup brown sugar
- ¼ cup granulated sugar
- 1 large egg
- 2 tsp vanilla extract
- ½ tsp baking powder
- ½ tsp baking soda
- ½ tsp salt
- 1½ cups all-purpose flour
Add-Ins
- ½ cup chocolate chips
- 2 sugar or waffle cones (broken into small pieces)
- 3 tbsp hot fudge (chilled or frozen)
- Flaked salt for topping
Variations
One of the best things about this recipe is how flexible it is! You can easily adapt it to suit your taste preferences or dietary needs. Here are some fun ideas to switch things up:
- Add Nuts: Toss in some chopped walnuts or pecans for added crunch and flavor.
- Go Gluten-Free: Substitute all-purpose flour with your favorite gluten-free blend for a gluten-free version.
- Try Different Fudges: Experiment with flavored fudges like caramel or white chocolate for a unique twist.
- Mix in Sprinkles: Add colorful sprinkles to the dough before baking for an extra fun touch!
How to Make Ice Cream Cone Cookies
Step 1: Preheat the Oven
Preheat your oven to 375°F (190°C) and line two baking sheets with parchment paper. This ensures that your cookies bake evenly and don’t stick!
Step 2: Cream Together Butter and Sugars
In a stand mixer fitted with a paddle attachment, combine the butter, brown sugar, and granulated sugar. Beat on medium-high speed until light and fluffy—this usually takes about 3 to 4 minutes. This step is important as it incorporates air into the mixture, giving your cookies their lovely texture.
Step 3: Mix in Egg and Vanilla
Add the egg and vanilla extract, mixing on low speed until smooth. This adds richness and flavor to your cookie dough.
Step 4: Combine Dry Ingredients
Gradually mix in the dry ingredients—starting with the baking powder, baking soda, and salt, followed by the flour. Be careful not to overmix; stop when you still see some flour remnants. Overmixing can lead to tough cookies!
Step 5: Add Chocolate Chips and Cone Pieces
Gently fold in the chocolate chips and broken pieces of sugar or waffle cones. Then, add three tablespoons of cold or frozen hot fudge in dollops onto the dough and swirl it gently. Don’t stir too much; you want those beautiful marbled patterns!
Step 6: Scoop the Dough
Using a scoop (I like using one that holds about 4 tablespoons), portion out cookie balls onto your prepared baking sheets. Leave some space between each ball as they will spread while baking.
Step 7: Bake!
Sprinkle each cookie ball lightly with flaked salt before placing them in the oven. Bake for 11-14 minutes until the edges turn golden brown. If necessary, use a spoon or spatula right after taking them out of the oven to shape them into perfect circles. Feel free to sprinkle more flaked salt on top if desired!
Now you’re ready to enjoy these delightful Ice Cream Cone Cookies—perfectly chewy, chocolatey, and oh-so-satisfying!
Pro Tips for Making Ice Cream Cone Cookies
Making cookies can be a delightful experience, and these tips will ensure your ice cream cone cookies turn out perfectly every time!
- Use room temperature butter: This helps create a light and airy texture in your cookies, making them soft and chewy.
- Don’t overmix the dough: Mixing just until combined keeps the cookies tender, avoiding a tough texture that can happen with overworking.
- Chill the dough: If you have time, refrigerating the dough for 30 minutes before baking allows the flavors to meld and can help prevent spreading during baking.
- Watch the baking time closely: Since ovens can vary, keep an eye on your cookies as they bake. Remove them when the edges are golden brown for the best results.
- Experiment with mix-ins: Feel free to add your favorite ingredients like nuts or different types of chocolate chips for a personalized touch.
How to Serve Ice Cream Cone Cookies
These ice cream cone cookies are not only delicious but also visually appealing, making them perfect for various occasions. Here are some fun ways to present them!
Garnishes
- Chocolate drizzle: A simple drizzle of melted chocolate on top adds an extra layer of decadence and makes the cookies look even more enticing.
- Sprinkles: Adding colorful sprinkles just before serving gives a festive touch that’s great for parties or celebrations.
Side Dishes
- Vanilla ice cream: A scoop of vanilla ice cream pairs beautifully with these cookies, creating a delightful dessert combo that resembles traditional ice cream cones.
- Fresh fruit salad: A refreshing fruit salad balances out the sweetness of the cookies and adds a burst of color to your plate.
- Milk: Serving these cookies with a glass of cold milk is classic and comforting, perfect for dipping!
- Whipped cream: A dollop of whipped cream on top or served alongside makes for an indulgent treat that complements the rich flavors of the cookies.
Make Ahead and Storage
This Ice Cream Cone Cookies recipe is perfect for meal prep and can be easily stored or frozen for later enjoyment.
Storing Leftovers
- Place cookies in an airtight container at room temperature for up to 3 days.
- For longer freshness, store them in the refrigerator for up to a week.
Freezing
- Allow baked cookies to cool completely before freezing.
- Place cookies in a single layer on a baking sheet and freeze until solid.
- Transfer to a freezer-safe bag or container, and store for up to 3 months.
Reheating
- To enjoy cookies warm, preheat your oven to 350°F (175°C).
- Place cookies on a baking sheet and heat for about 5-7 minutes, or until warmed through.
FAQs
Can I use different types of cones for Ice Cream Cone Cookies?
Absolutely! While sugar or waffle cones work best, feel free to experiment with other cone types like chocolate cones for added flavor.
How can I make Ice Cream Cone Cookies gluten-free?
To make these cookies gluten-free, substitute all-purpose flour with a 1:1 gluten-free flour blend. The texture may vary slightly, but they’ll still be delicious!
What should I do if my cookie dough is too dry?
If you find your cookie dough is too dry, add a teaspoon of milk at a time until it reaches the desired consistency. This will help bind the ingredients without affecting the taste.
How can I enhance the flavor of my Ice Cream Cone Cookies?
You can add extra mix-ins such as nuts or dried fruit to elevate the flavor profile. A pinch of cinnamon or nutmeg could also bring delightful warmth to your cookies!
Final Thoughts
I truly hope you enjoy making these delightful Ice Cream Cone Cookies as much as I do! They are not only fun to bake, but they also bring a touch of whimsy to any dessert table. Don’t hesitate to share your creations with friends and family — I’m sure they’ll love them just as much!
Ice Cream Cone Cookies
Ice Cream Cone Cookies are a delightful twist on your favorite summer treat, combining chewy cookie dough with the crunchy goodness of broken ice cream cones. These cookies burst with chocolatey flavors and are swirled with rich hot fudge, making them a perfect dessert for any occasion. Whether you’re hosting a casual get-together or simply indulging after a long day, these cookies are sure to bring smiles to everyone’s faces. Quick and easy to make, they can be prepped in just 27 minutes and are ideal for sharing or gifting. Get ready to enjoy a nostalgic cookie experience that’s fun for the whole family!
- Total Time: 24 minutes
- Yield: About 12 cookies 1x
Ingredients
- ½ cup butter
- ¾ cup brown sugar
- ¼ cup granulated sugar
- 1 large egg
- 2 tsp vanilla extract
- ½ tsp baking powder
- ½ tsp baking soda
- ½ tsp salt
- 1½ cups all-purpose flour
- ½ cup chocolate chips
- 2 sugar or waffle cones (broken into small pieces)
- 3 tbsp hot fudge (chilled or frozen)
- Flaked salt for topping
Instructions
- Preheat your oven to 375°F (190°C) and line two baking sheets with parchment paper.
- In a stand mixer, beat together butter, brown sugar, and granulated sugar until light and fluffy.
- Mix in the egg and vanilla extract until smooth.
- Gradually add baking powder, baking soda, salt, and flour; mix until just combined.
- Fold in chocolate chips and broken cone pieces; gently swirl in hot fudge.
- Scoop dough onto prepared baking sheets, spacing them apart.
- Sprinkle lightly with flaked salt before baking for 11-14 minutes or until golden brown.
- Prep Time: 10 minutes
- Cook Time: 14 minutes
- Category: Dessert
- Method: Baking
- Cuisine: American
Nutrition
- Serving Size: 1 cookie (30g)
- Calories: 150
- Sugar: 10g
- Sodium: 80mg
- Fat: 7g
- Saturated Fat: 4g
- Unsaturated Fat: 2g
- Trans Fat: 0g
- Carbohydrates: 20g
- Fiber: <1g
- Protein: 2g
- Cholesterol: 15mg